- Images << Back to the previous page
-


-
The LT BRF3 F3 Flight Control Integrated OSD for DIY FPV Cross Racing Mini Drone QAV250 QAV-R Nighthawk 250 Robocat 270 Quadcopter is optimized for Cleanflight/Betaflight firmware. It is equipped with an ARM Cortex-M4 core STM32F303CC with 32bit/72MHz/256K Flash/40K SRAM and hardware floating point unit. It also has built-in 8MB flash for black box log recorder. On-board OSD provides absolutely original MAX7456EUI+ and standard FTDI debug port. Plus, it offers up to 3 serial ports and 8 PWM outputs. Click and order now!
Features
- Optimized for Cleanflight/Betaflight firmware
- ARM Cortex-M4 core STM32F303CC with 32bit/72MHz/256K Flash/40K SRAM and hardware floating point unit
- MPU6050 and BMP180 / BMP280 sensors
- Built-in 8MB flash for black box log recorder
- On-board OSD with absolutely original MAX7456EUI+ and standard FTDI debug port
- Receiver connector with PPM/SBUS/SumD/DSM2/D.S.M.X and RSSI input
- Up to 3 serial ports and 8 PWM outputs
- Multifunction connectors with SWD/UART2~3/Soft-serial/Buzzer/LED trip/Voltage detection
- Multifunction OSD connectors with video_IN/ video_OUT/ICSP/debug port (UART1)
- PDB connector with 5V input/Current and Voltage detection
- Power input reverse polarity protection
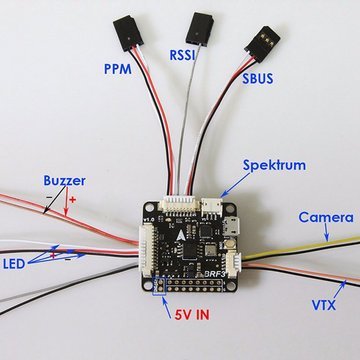
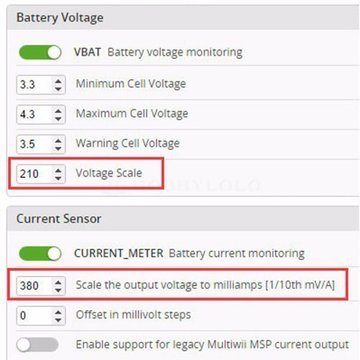
- Include a PPM/RSSI/SBUS/SumD receiver cable, a camera/video-TX cable, a buzzer/LED strip/voltage detect cable and an OSD debug port to FTDI adapter cable Getting Started First Install lastest Silicon Labs CP2102 USB to UART bridge VCP Driver. www.silabs.com/products/mcu/pages/usbtouartbridgevcpdrivers.aspx Install and launch the Cleanflight Configurator tool. chrome.google.com/webstore/detail/cleanflight-configurator/enacoimjcgeinfnnnpajinjgmkahmf gb Connect flight controller to computer via USB cable. Select the correct COM port if it is not automatically detected. Click connect, verify that communication is established. Basic Configuration Calibrate sensors Configure ports. Enable features. Configure receiver mode. Configure voltage monitoring. Voltage Scale must be 110. Configure current sensor. If you use BRPDB the Scale must be about 380. Configure RSSI if you using a receiver with RSSI output. Configure other features. Configure receiver, set channel mapping. Learn about flight modes and configure channels/switches to activate them as required. Learn how to arm/disarm. Bench-test failsafe. Read safety notes. Learn how to download and view your flight logs to help tune your aircraft. Erase dataflash contents before first flight (so you have a log). Learn how to recognise un-tuned flight characteristics and the effects of a PID controller. (Watch some videos). First flight should be in Acro/Rate mode (the default mode when no other modes are active). Tune PIDs. Backup settings. Firmware Flash (Upgrade) Disconnect power, USB cable and click the Firmware Flasher tab. Click load Firmware [local] and found that the firmware file. Be sure selected No reboot sequence / Full chip erase / Manual baud rate 25600. Press and hold the boot button and released after connecting the USB cable. Click Flash Firmware and wait for the prompts to complete it. OSD Debug Don´t connect any power to the quad. Install FT232 VCP driver and connect FTDI to SE port via FTDI adapter cable. Download MWOSD GUI zip file and open it. Select the right COM port and wait for reading OSD configuration parameters. Learn how to modify the parameters, font and write back to the mcu of OSD. Jack and Power Distribution The 328P of OSD connected to F303 via UART1. GPS/SWD/I2C jack connected to F303 via UART2. SBUS/DSM2 jack connected to F303 via UART3. When using PDB or external 5V power supply, OSD circuit keep working and communicate with the F303. If you plug a USB cable, the OSD circuit is cut off powered to ensure that the FC can communicate with computer. When debugging OSD, do not connect the battery/USB cable and just plug a FTDI tool via the FTDI adapter cable. At this time only OSD circuit to work independently.
Specifications
Brand LT Model BRF3 Power Input 5.0-5.5V Fixing Hole Spacing 30mm Dimensions (1.38 x 1.38 x 0.35)" / (3.5 x 3.5 x 0.9)cm (L x W x H) Weight 0.26oz / 7.3g Package Includes
- 1 x LT BRF3 F3 Flight Control Integrated OSD